14 Steps To Successful Lip Sync Breakdown
Once you have recorded your soundtrack you need to import it into an editing program such as Premier. Once it is placed onto the timeline and you are happy with it’s placement as far as lead time “head” and end time “tail” are concerned, you need to follow the steps outlined below. Use the time count that is shown on your time line. Also note that time is measured in 30 frames per second.
1) Listen to the track.

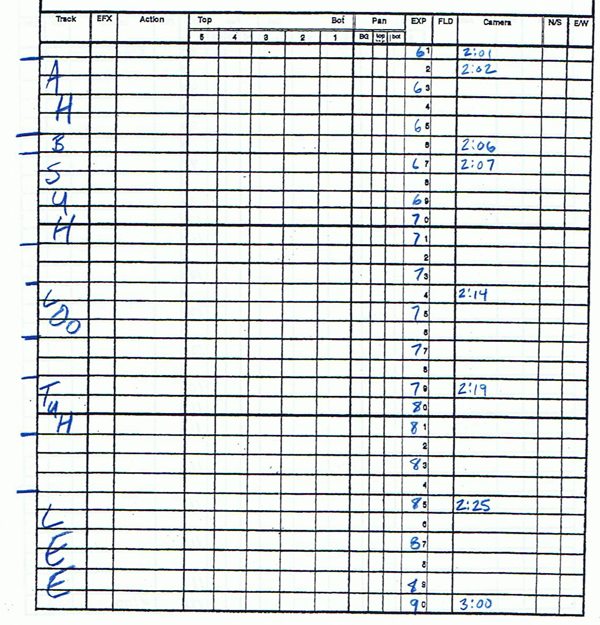
2) Find the start frame and end frame of the SCENE: i.e. 00:03:22 and 00:08: 15
3) Label the X-sheet: • Scene number.
• Start frame (in the example in step 2, this would be - 03:22) If you have each scene saved as a separate project in Premier the start frame would be 0:01
• End frame (in the example in step 2, this would be - 08:15) In the visual above, the end frame is 4:13.
• In the camera column, fill in the frame count for entire scene in seconds and frames (this will be the Premier time).

• Fill in sheet numbers: i.e. 1 of 5, 2 of 5, 3 of 5, etc.
• Fill in exposure numbers on odd frames (this will be your pencil test frame count, if you are using a Lunchbox for example).
• Staple the X-sheets together in order.
4) Listen to the track again.
5) Find the frame of the first sound in the first word. Scrub the timeline until you find it. In this example shown here, the first sound of "AH-bsolutely" is on 2:02 in the Premier timeline, that would be frame 62 on your exposure sheet.

6) Mark the start frame on your X-sheet in PENCIL.

7) Scrub the first word. Find the first sound of the word. In this case it's "Ah". Mark the frame that the sound ends on on the X-sheet.

8) Scrub the word and listen to major sound changes. Mark the sound on the appropriate frames.

9) Continue through the track for all the sounds for each word.
• Listen for blended words that slur together.
• Mouth the words yourself as you scrub the track so you can pinpoint the major sounds.
• Mark all these on the X-sheet.
• Write the words out AS THEY SOUND, not as they are spelled.
10) Double check all numbering and soundtrack breakdowns!!! You need to be really accurate with this.
You can now take the X-sheet to your desk as the remaining steps do not require the computer.
The following is the process you would use if you are doing "limited animation" where the character's mouth is on a separate animation level. This is typical if you're animating in Flash.
11) Take the X-sheet and begin with the 1st word.
• In the margin, draw a thumbnail of the characters mouth position for each phonetic sound as it corresponds to the sound breakdown
.
• Assign the mouth position a number (for "absolutely incredible" the first sound is "ah" with the mouth wide open, so it would be "mouth position 1". The next sound is "buh" with the mouth fully closed, so it would be "mouth position 2".
• Move on through all the sounds in each of the words following the same process.
• Each time you come across a sound and mouth position you’ve used before in this scene, write the number down rather than doing another thumbnail drawing.
• Complete the entire X-sheet.
12) On a separate piece of paper, draw out each of the mouth positions in numerical order to create a mouth chart for your character.
13) Look back over the X-sheet to see if there are any inbetween mouth positions required to make the lip sync less choppy. Draw these out on the X-sheet.
14) Begin your thumbnail animation of the character looking for the key accent positions.

If you are doing more traditional "full animation" where you're drawing the character all on one level, you should use the following process:
11a)Take the X-sheet and begin with the 1st word.
• In the margin, draw a thumbnail of the characters mouth position for each phonetic sound as it corresponds to the sound breakdown.
• Don't bother with assigning any numbers to the mouth positions.
• Move on through all the sounds in each of the words following the same process.
• Each time you come across a sound and mouth position draw a little thumbnail of the mouth position. You might even want to draw the angle of the head if it tilts up, down or side to side.
• Complete the entire X-sheet.
12a) Begin your rough animation for the entire scene even if there is no dialogue at the very beginning. Key out all the extreme positions of the character through the scene. Look for accent points within the dialogue. Perhaps the character might have their head come down sharply on a specific part of the word. Draw this as a key pose. For some dialogue, you might have quite a few accents that might come very close together and you'll feel as though you are doing practically every drawing in the scene. Don't worry about that.
13a) After you have all the drawings done, go back and assign a letter to each one, starting with "A", then "B",then "C", etc. Don't use numbers as you're going to have to add in inbetweens later anyway, so the letters make it a bit less confusing. Put the letters anywhere on the page except the lower right hand corner. Later, when you decide on the final timing, you'll want to write the numbers in this space, so keep it clear for now.
14a) Go back through the scene and flip the drawings to see if you're happy with the action first. If anything is missing, add a drawing in to make the action clearer. If you need to add in a drawing between "G" and "H", then call it "G1". If there are two to be added in, call them "G1" and "G2", etc.

When you're satisfied with the rough action, pull out the exposure sheet and in the 2nd level column, write in the "A, B, C" drawings as they correspond to the dialogue. (Something else you can do if you want to, is write the word that the character is saying on each drawing and underline the specific sound that this drawing corresponds to. It kinda makes things clearer for you when you're looking at them individually.)

Once your exposure sheet is filled in with the letters for the drawings, you now have your rough timing set up. Do a pencil test and match it up with the sound track to see if it works properly.

If you're using Premier, you can go in and shift the drawings around a bit so that they hit a bit earlier or perhaps later. Play around with it until you're happy with the way it syncs up.
Now, you can go back into your exposure sheet and fill in the numbers of the drawings starting with 1. Every two frames add a number. If the alphabetic drawing falls on a frame before or after the sequencing of your numbers, you might have to add in an extra drawing on "one's" to make it work out properly. Whatever you do, don't leave a gap of two frames between the drawings as that will put it on "three's", which as a general statement is not something you want to do.

Once the numbers are all filled in on the exposure sheet, go back and write the numbers on your drawings. Circle these numbers as they are now your final keys. Also circle these key numbers in your exposure sheets as well.
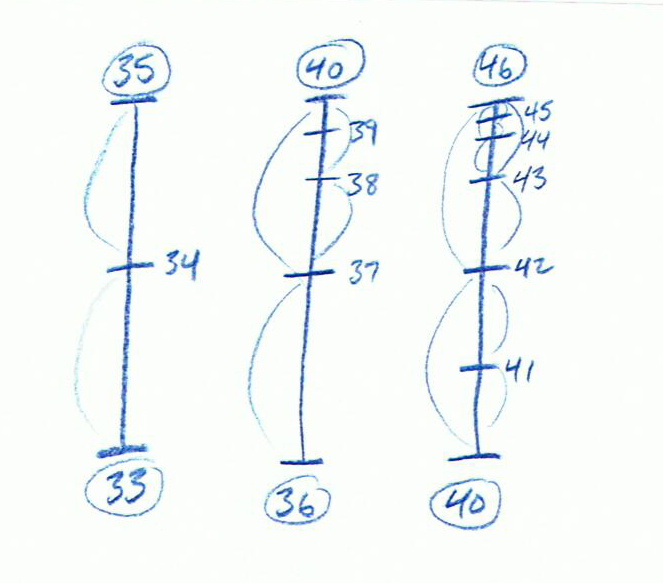
Now all you need to do is write out the timing charts on each of the key drawings. Look at the exposure sheet to see how many inbetweens there are. If there's just one, make it a half. If there are two or more, you need to decide if you want to slo-in or slo-out or make it a constant rate between the keys. See the section on timing charts if you're not sure how to draw them. Here are the timing charts for this set of keys in the example above:
Using this system, your timing is pretty much dictated to you by the dialogue.
Now when you go to inbetween the keys, be sure to leave the mouth positions off until you have everything else drawn. The reason for this is that the timing for the mouth positions might be different from that of the body gestures. Look at the exposure sheet and be sure the mouth position matches what it shows (it might end up being completely different from what you might have done as a half inbetween position).